If you would like to have a go at making your own Winter Sparkles Tag Book, here are some ideas to get you started - I'd love to see your finished projects, so remember to show-n-tell by using the link at the bottom of my Frosty Festivities blog post.
Here's a picture of my finished tag book ...

First of all, dig out some plain chipboard or recycled heavy card for your tag bases and a book ring to hold your book together. Then, have a good root through your stash for patterned papers in your chosen colour scheme - you can use quite small scraps for this project - and rummage through those drawers and boxes for all kinds of sparkly, twinkly trinkets with which to adorn your book.
Pile it all up on your workdesk, stand back and see what you've got - here's my haul ...

Plain chipboard, textured Grunge Board, plain Grunge Paper, shrink plastic, silver glitter foam sheet, Anita’s Angel Hair voile paper, printed acetate, recycled white corrugated packaging, silver star punchinella, silver metallic paper, assorted patterned papers, paper doilies, selection of sparkly jewels and pearls, embroidery thread, twinkly twine, assorted scraps of ribbons/lace/trims, assorted flowers, small blue beads, crystal beads, vellum star pendant, metal charms, bottle caps, sparkly mini pompoms, buttons, vintage jewelled button, chipboard pieces, scraps of old denim and tulle, silver glitter
board, acetate butterflies, book ring.

Here's a template ...

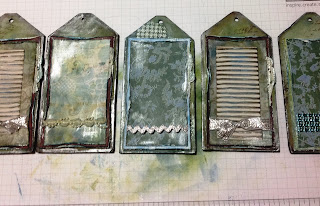
I decided to cut five tags for my book (but you'll see that I later added a front and back cover) ...


Step Fourteen - trim each tag with a small piece of ribbon or lace ...


... beeeeoooootiful irridescent twinkles!


... then add ink, stamps, embossing powder, glitter and gilt cream ...


Here's a picture of my finished tag book ...

For more pictures of the completed book,
please check out my Frosty Festivities blog post
... yours will probably end up looking completely different, because of course you'll use your own supplies and your own creativity. You don't need to buy anything especially for this project - it's a good opportunity to use up some old stash, leftovers and recycled items and turn them into something fabulous!
First of all, dig out some plain chipboard or recycled heavy card for your tag bases and a book ring to hold your book together. Then, have a good root through your stash for patterned papers in your chosen colour scheme - you can use quite small scraps for this project - and rummage through those drawers and boxes for all kinds of sparkly, twinkly trinkets with which to adorn your book.
Pile it all up on your workdesk, stand back and see what you've got - here's my haul ...

Remember to leave a comment on my Frosty Festivities blog post
for a chance to win this pile of goodies for yourself!
I also grabbed my basic tool kit and gathered up a couple of background stamps, Distress Inks, chalk inks and clear pigment ink, silver gilt cream, glitter paste, glass glitter, embossing powders, embossing paste and the Cuttlebug with some of my favourite dies (you could use punches instead).
OK - you're ready to get started - you could probably make this in a day if you put your mind to it, but it took me several evenings as I'm not the fastest crafter on the block and there was a lot of dithering involved!
Click on the images to enlarge them if you want to see more detail.
OK - you're ready to get started - you could probably make this in a day if you put your mind to it, but it took me several evenings as I'm not the fastest crafter on the block and there was a lot of dithering involved!
Click on the images to enlarge them if you want to see more detail.
Step One - create a template for your tags and cut out as many as you want in your book.

Download the tag template pdf

Step Two - cover both sides of each tag with patterned paper ...

Step Three - punch a hole in the top of each tag using a crop-a-dile or eyelet punch ...

Step Four - apply some embossing paste, using some of the punchinella as a mask ...

... do this on one side of each tag ...

Step Five - apply twinkly embossing powder while the paste is still wet ...

... shake off the excess and use a heat gun to melt the powder ...

... here's a close-up of the sparkles!

Step Six - use various shades of Distress Ink to add colour to your tags (the embossed part will resist the ink which is fun) ...

Step Seven ... add some interest to the plain sides with background stamps ...

Step Eight - decide on a basic design for your tags, or use the sketch below if you like ...

Download the tag sketch pdf
Step Nine - start preparing your layers. For each tag cut two pieces slightly smaller and two slightly smaller again (so it depends on the size of your tags, but for my five tags I cut ten pieces at 2 3/4" x 4 3/4" and ten pieces at 2 1/2" x 4 1/2") ...

Step Ten - grunge them up by inking and distressing the edges - I also inked up some pieces of the voile paper, corrugated packaging and doilies - so here we are all ready to start layering up ...

Step Eleven - begin building your layers ...

Step Twelve - adhere the layered rectangles to your tags, tear the doilies into ten pieces and tuck one piece between the layers on each side of every tag ...

Step Thirteen - apply metallic gilt cream to the edges and textured surfaces of your tags ...

... I love the effect this gives - here's a close-up ...


... on each side (you could also add frames, rub-ons, fabric, more stamping, whatever floats your boat) ...

Step Fifteen - my favourite bit! Turning this collection of bits and bobs ...

... into this pile of pretties! I love the idea of making my own embellishments from scraps and tarting up the ready-made ones to make them unique ...

I'm sure you'll have lots of ideas, but here are some to kick you off ...
Add sparkle to ready made blooms with some Glitter Paste or other sparkly medium ...

... beeeeoooootiful irridescent twinkles!

Customise plain paper blossoms like these ones from Stampin' Up!

... stamp a pattern onto them using a waterproof ink such as Ranger Archival (so that it doesn't smudge) ...

... colour them with various shades of Distress Ink, fluff them up and finish with cute buttons or pearls ...

Squish a couple of bottle caps in your diecutting/embossing machine (I used my Cuttle bug) NB these have to be new bottle caps - used ones won't squish properly - but they're only about £1 for a bag of 50 in the Home Brew section of our local supermarket, so they won't break the bank ...

... to create these cute little trinkets which are begging to be filled with something ...

... pull out the plastic liners and replace with patterned paper ...

... or sprinkle with twinkles! For more bottle cap ideas, click on the "Tutorials" tab at the top of my blog.

Create some beautiful butterflies - use alcohol inks to colour images stamped or printed onto acetate (you could use acetate from packaging for this - stamp with Stazon or draw with permanent pens) ...

... cut them out and add jewels then gently bend the wings upwards to add dimension ...

Colour chipboard and metal pieces with Distress Paint ...
(you could die cut the board from packaging or paper pads and repurpose broken jewellery if you like)

... then add ink, stamps, embossing powder, glitter and gilt cream ...

... to make them uniquely yours ...

Make a Shrink Plastic Charm, by diecutting shrink plastic ...

... coating in clear pigment ink and metallic embossing powder, then heating to emboss and shrink at the same time - scary but very satisfying and the metal tweezers are essential!

I've used my home-made key charm as the body of a butterfly on one of the tags ...

(for more shrinky tips and ideas, click on the "Tutorials" tab at the top of my blog) ...
Now gather up all your remaining pieces of paper, fabric and other materials ...

... and hand cut or diecut them into circles, flowers, leaves, butterflies, whatever takes your fancy!

... I also cut an acetate tag for my front cover and a Grungeboard tag for the back ...

... the Grunge Paper spirals were inked and rolled into the roses which you can see in the picture below (there are loads of tutorials on YouTube about making spiral roses if you need some tips).
Once you've finished cutting, sticking, inking and twinkling, you should have a pile of gorgeous goodies to play with (click on the picture below to see more detail)

Once you've finished cutting, sticking, inking and twinkling, you should have a pile of gorgeous goodies to play with (click on the picture below to see more detail)

Step Sixteen - decorate your tags with your gorgeous hand made adornments ...

... both sides! (warning - use strong tape or adhesive, especially if you're making this as a gift)

Step Seventeen - finishing touches - cut long triangles from scrap paper and roll into paper beads (again, there are loads of brilliant tutorials on YouTube if you need some inspiration)

I've made a cunning tool by splitting the blunt end of a wooden kebab stick, then winding tape around it about an inch from the top. Just slot the fat end of the paper in and start winding,until you're about an inch from the end, then add a dab of glue to secure your bead - easy peasy! ...

... to give a glamourous finish, roll your paper beads in clear pigment ink, then in embossing powders and glitter or anything else you can think of ...

Step Eighteen - assemble the book. Stack your tags and hold them together with a book ring. Cut several lengths of pretty ribbons, thread with an assortment of beads and charms and tie these onto the ring.

All done! Don't forget to link your project to my original Frosty Festivities 2013 post as I'd love to see what you create :o)
Comments